Sunday, March 25, 2012

Gift Card Holder

I will be travelling to the lovely city of Savannah, GA this weekend for a wedding. I am a bridesmaid and have been looking forward to this for awhile! After thinking, I decided to get the bride & groom a giftcard. I know, SO impersonal. But I know the bride pretty well (she is one of my best friends!) and I remembered her saying she was hoping everyone just gave them money. So, I opted for the giftcard. And since I am Gina, I wanted to come up with a really cute way to present it. I searched Pinterest and the web for inspiration and came accross this gem:

Cupcake Gift and Money holder

So cute! But how to put the card inside? I was confused so instead I came up with my own version.

Supplies:

1 half sphere of styrofoam ball
1 foam circle with a flat top (looks like a cupcake with no rounded part)
pins
ribbon
scrapbook paper
something for a topper if you want

1. I used turquoise and red, the wedding colors & colors from their invitation. First I took the half sphere and put rows of ribbon on it. I pinned down each little lump with a pin. I tried to make it look kind of like frosting.


2. Then I cut out of strip of red and white striped paper for the cupcake paper. I wrapped it around the base and secured it using Glue Dots (those things rock!)

3. I stuck the two halves together, again using glue dots. I traced a circle to fit the bottom and glued that on, basically just to cover the styrofoam. I had bought a little bride and groom for the top, so I glued it to a toothpick and stuck it in the top like a cake topper. Then I put my giftcard and note in an envelope and glued it to the bottom.

4. I wrapped it up with celophane and used a ribbon to tie it together.


I liked doing this project but it took awhile. It was hard to get the frosting right and to get everything to stay together. It is a little elaborate just for a gift card holder but I think for this wedding, especially since I am in it, it was worth it!

Coasters


"How many times do I have to tell you, USE A COASTER!"
-T Ray, college

(One of my college roommates had this weird pet peeve about the rest of us not using coasters. Apparently she didn't want rings on her nice coffee table she was letting us all use. We were then forced to use the coasters she provided us with. I sure wish I had thought of these cuter ones back then...)

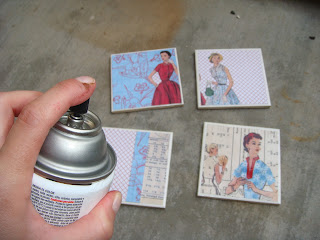
This is a super simple crafty activity. You pretty much cannot mess up when you make these. I made myself a set for my living room (above) and a set that I mailed to my parents. They work and they're cute. Here's how to do it:

Supplies:


Scrapbook Paper
White tiles
Mod Podge
Clear Spray Paint
Cork Backing

1. I am making this set for my best friend. She likes blue so I thought this scrap paper I had would work in her house. She's actually moving to a new place soon so I think I'll give this to her as a sort of housewarming gift. Anyways, pick out what you want on your coasters. You can use paper, fabric, paint, pictures, lace, dried flowers, etc. Be creative! For this one I just did paper. Trace the square tile onto the paper so you know how big it needs to be and cut it out.

2. Mod Podge the paper to the tile. I put a layer of the glue on the tile first, then the paper, then more glue. By the way, I love Mod Podge. Mod Podge is a crafters best friend. You can use it for everything, and probably on the kitchen sink as well.

3. Let the Mod Podge dry completely. Then take the coasters to a well-ventilated area and spray it with the clear spray paint. I took mine outside on the porch. This stuff stinks. It makes it so the coasters won't stick to your drink when you use them & it locks out moisture.


4. Let the spray paint dry. This kind is a quick-dry so it only took about 10 minutes. Next, put a backing on the tiles so they don't scratch your table. Scratches would be worse than moisture rings, I think! I found this awesome sticky cork at Micheal's in the scrapbook paper aisle for 50 cents. It is just a sheet of cork with a sticky back. I suppose you could also use those little round things you put under chairs.

....and ta da! Coasters.


I hope my bff likes 'em.

Cost for this project:

Sticky Backing: $0.50
Tiles: $0.90 each at home depot
Paper, Mod Podge, Spray: Free because I already had it...

So about $5. It would be more if you didn't have the supplies. But I think if you started from scratch it couldn't be more than $15.00.

Wednesday, March 14, 2012

St. Patrick's Day Crafts

As a crafty blogger, I feel like I should keep up with holiday crafts. However, I am also busy this week (and last week, and next week...) SO I decided to post other people's cute St. Patrick's Day crafts! This is what I WOULD be doing if I wasn't going out of town :) 

1. DIY Hats
It's a little cupcake hat! How cute! There are 2 other hats on that site also.


2. Irish Canvas Art
I LOVE this idea! I am thinking of ways already to use this around my own house. My bathroom could use some new art...

3. Water Bottle Decor
This would be cute if you had to bring drinks to work or school. I actually made little banners for the straws at my friends baby shower. They looked cute, but I did hear someone ask another person, "What are these things? Straws?" Haha :) I personally don't plan on drinking much water on St. Patrick's Day. Can you make decorations for beer cans? Who knows.

I'll be in Savannah this year for St. Patrick's Day and I am way excited! They have a really awesome celebration downtown. Green beer, a green river, it will be great!

Happy St. Patrick's Day Everyone!!

Homemade Laundry Soap

This is more for my stingy side than my crafty side! I am currently in the process of making my own liquid laundry soap. I have read that it is WAY cheaper than brands from the store and really easy to make.


For this recipe, I used:

1 Cup Washing Soap
1 Bar Fels-Naptha laundry Bar soap
3 gallons and 6 Cups of water

1. First, grate the entire bar of soap.


2. Next, pour it into a pot with 6 Cups of water. Heat on medium heat until the soap is all melted.
3. Fill a bucket with about 3 gallons of water. Dump the melted soap mixture into the bucket. Add 1 Cup of Washing Soda and stir.

Then just let it sit! For about 24 hours. It apparently is going to turn kind of goopy. Then I am going to pour it into two empty gallon milk jugs (I'll have to come up with cuter storage, but for now milk jugs will work)

 There are a ton of recipes online for homemade laundry soap so next time I might try another one. Most of the recipes have Borax in them, which is why I bought the Borax.

I really like the smell of laundry soap on my clothes so I am not sure if I will like this! I love it when my sheets smell all Tide-y. I guess it's a comfort thing? I read on several sites that you can use some drops of essential oils to make it smell like you want it to. Yum, I may try that too! The Fels-Naptha soap actually smells really good too though so who knows? This will probably be an ongoing project! Just wanted to share my craftiness for the week.

Also, my boss showed me an easy way to make really cute ribbon flowers I;m excited about so I will put that on here soon!

-Gina-

Sunday, March 11, 2012

Flower Ball


This is a project I did for my friend's baby shower. I had seen a picture of a flower ball online somewhere but then sort of made up the steps as I went along. I did something right, because they turned out really good. My friend ended up keeping the balls to put in her son's nursery. You could say I am a proud auntie :) Again, I completed this project before I made my blog so I don't have many step-by-step pictures! Sorry.

Supplies:

ALOT of ribbon (I used maybe 13 rolls for 5 flowers)
different sized foam balls
wooden dowels
pins
vases
sand
decorations for in the sand

1. First, cut up all the ribbon into about 1 1/2 inch strips. Roll each piece into a circle and then use one pin where the ends of the ribbon meet to stick it into the styrofoam. I put the pieces all different ways to create a more random look, but you could put them in rows all the same way if that's what you prefer. This takes a very long time. About an hour and half for each ball! I turned the TV on, and sat down on my couch to do it. It can get pretty tedious.


2. Once the styrofoam ball is covered with ribbon, it is time to stick the wooden dowel into it. I painted my dowels a baby blue to match the theme. Then just stuck the end into a tiny blank spot I left on the ball. This creates the 'stem' of the flower. I had to use a dowel because the balls end up to be a little bit heavy and they needed something sturdy to hold them up. At Micheal's, they had small wooden dowels already cut to about 12" long which was perfect for this project. I suppose if you had to, you could buy a long dowel and cut it into the size you needed. I don't own a saw, so the precut version was much better for me.

3. I borrowed 5 clear glass vases and filled them about three quarters of the way with decorative sand. I stuck the dowel down into the sand until it stayed upright. I had gotten some small pacifiers and diaper clips to drop down onto the sand, again going with the theme for the baby boy shower. I tied a ribbon around the vase and voila! Done.


We placed them in different parts of the house for the shower. Two were centerpieces on a picnic table, one was on the dessert table, and two are shown above on the mantle of the fireplace.

Clothesline Picture Frame

This is an idea I originally saw on Pinterest. It was incredibly easy to do and turned out so cute! I have been pleased with it. I also saw something very similar at Pier One Imports for about $50.00. This made the frugal Gina inside me smile because mine cost about $20.00 to make! I made this project before this blog was born, so I apologize for no step-by-step pictures.


1. First, you will need to buy an empty frame. If you already have a frame you aren't using, even better! I found this one at Micheal's for about $17.00 in their custom framing area. I chose this one because it had a wide area inside the frame for me to put the nails into.


2. Next, I just used some small nails and hammered them into the edges. Then I took some Jute Twine that I had and tied a knot to the nails on either side to create a "clothesline" look.


3. Then, I bought a bag of clothespins. They were about $3.00 for 15 at the craft store. I added coordinating scrapbook papers to make them look more decorative. I cut the papers to fit both sides of the pins and then modpodged them to the pins.

4. And lastly, add pictures! I think this is the best part of this project because you can swap out pictures whenever you want. I chose a group of pictures of me and my family when I was younger, but in the future I might switch to pictures from a special event or something like that. It is perfect for showing off all of those good pictures that may otherwise just go into a book.