Monday, October 22, 2012

HAPPY HALLOWEEN!

Fall is my absolute Favorite with a capital F season of the entire year. I love wearing sweaters and boots. I love pumpkin flavored everything and cool air. Fall time also means Halloween time, which happens to be my absolute Favorite with a capital F holiday of the entire year! Unfortunately, I have a disgusting foot deformity called a bunion (WebMD that one)  that will be operated on shortly before Halloween this year. Which means NO costume. I was planning on either being a vampire (TrueBlood Style!!) or a paper doll. Instead my foot will have a boot on it and I may or may not be conscious on Halloween. Oh well, I will save costume ideas for next year...

Boyfriend and I went pumpkin and apple picking this weekend. So fun! Aren't I cute with my pumpkin?
Then we went home and I spent a good two hours carving that thing. Wow that takes forever! I did not recall that from my childhood. I'm guessing I ran off to play while my parents finished it or something. Anyways, here are my lovely carved pumpkins:
This is the witch. She's not a very attractive witch. She could use a little plastic surgery on that humungo chin of hers. Oh well. And here's my kitty on top of a pumpkin (in honor of my two kitties):

Have a safe & happy Halloween and think of me laying on the couch! Also, get excited for my latest obsession: Zentangle.


Wednesday, October 10, 2012

4 Just Really Great Ideas

This is sort of a random post. I apologize. However, I am sitting in a room with about 40 other people for jury duty and I have to have something to eat up my time! I luckily took pictures of my 'great' ideas the other day so that I can post while I wait. Thank the Lord for SmartPhones!

I do not claim to be a genius. I actually do realize that I am probably only of normal intelligence, heavy on the abstract and very weak on the math. BUT every now and then I encounter a great idea. And I am now nice enough to share a few of them with you.

Idea Number One: Cat Box with a Lid

I have had this box for the litter box for over a year now and I LOVE it! I can't take credit for the craftsmanship (that goes to my handyman father) but I did tell him what I wanted him to make. It is basically a box with two square 'doors' cut out of it, big enough for a cat to go in and out. We cut two doors in case I move it to a new spot and one door has to be up against a wall. The lid is removable so that the litter box can be cleaned:
Inside View:

 I keep mine in the laundry room so when the lid is on the box I put my laundry baskets on top of it. It keeps the smell to a minimum and I normally put an air freshener in it to be sure. Of course, with two cats using it several times a day (and I mean SEVERAL! Anyone else's cats go to the bathroom all the time? From the amount of poop I scoop, it seems like they're just in there all day) nothing will keep that smell down unless it is cleaned, but it does contain it better than having an open box just sitting there. It also kind of hides the litter box. Nothing is grosser than walking in someone's house and seeing a poopy litter box. Right??
(Model shown above is Finn Hanson. He is a three year old tabby, 1 foot tall, about 12 pounds. He is a very festive cat and loves to wear his seasonal bandanas. He is excited about the prospective modeling prospects that may come from this publicity.)

:)


Idea Number Two: The Breeze System
So random, but I just wanted to tell y'all that if you have cats and a hardwood (or tile) floor, you HAVE to get the Tidy Cats Breeze System. It works like a charm. No more sand from the clumping litter all over your floors!! Look in the picture above of the inside of my box. You'll notice there are pellets rather than sand. The pellets are much easier to pick up if they come out of the box. Such a great invention!

Just sayin'.

Idea Number Three: Painting

When painting your house, leave about a 6 inch gap from where your paint ends to where your ceiling starts. This way there are no little paint spots to get on the ceiling.

You know how that goes: you paint on the ceiling and then have to go find the ceiling paint (where did I put that? Is it the same as the paint on the walls?), climb back up the ladder and paint over your spots. If you do this, it leaves a nice line and looks like a little border. Use blue painter's tape to mark off where you want the paint to end, and make it equal around the whole room. My mom actually showed me this when she visited and I think it's genius. It also looks really cute!

Idea Number Four: Air Filters
This just really appeals to my cheap side. At Home Depot, there is this Natural Aire Cut to Fit kind of air filters for you air conditioner. They are awesome. They are super cheap (I think like $4.00) and you can reuse them over and over. It is just a big green filter and then you cut it to the size of your filter. After a month of use, take it out and rinse it out under a faucet. Let air dry and put it back in. Works great and is super cheap!!
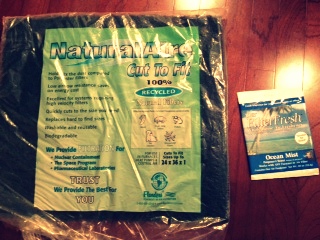
My fifth great idea was going to be air fresheners. But this great idea turned out to be not so great. There are these $1.00 fresheners you can get at Wal-Mart that you attach to the air filter. Then when the air turns on, it sucks it through the filter and the air coming out of your vents smells awesome. It worked for a few months, but then the freshener unknowingly fell down into the drain line and clogged it up. I had to call the maintenance man from my condo to come look at it and he said "Never put something in that line again." Enough said, dude. I removed the freshener. Sometimes things that SEEM like a good idea, turn out not to be so good...

Sunday, October 7, 2012

DIY Birthday Cards

I know I have been a bad, bad blogger lately. I have still been crafting, but not taking the time to put it on my blog. I'm sure my 3 followers have been very upset ;) Anyways, what I have been working on is Christmas gifts. It IS only October, I realize that, but time flies and I thought that I had better get started!

If your name is Stephanie, do NOT read ahead! Christmas gift spoiler!

One gift I am planning to give is my homemade cards. I'll do a pack of birthday, thank you and personal/initial cards that are blank on the inside. Tied together with a ribbon, these are great gifts! Here are examples I did this weekend:


Three boy birthday, three girl birthday. I LOVE the brown paper cards and envelopes I got at Hobby Lobby on Friday for around $7.00. They are really thick and good quality, I highly recommend! Basically anything from Hobby Lobby I can endorse. That store is heaven...sigh....

Friday, May 25, 2012

Flower Canvas Art


This is another little project I discovered on Pinterest: http://itsdoable.squarespace.com/blog/2012/1/23/its-doablethe-flower-wall-art.html#comments

(btw I love that It's Doable blog. I would follow them, but can't figure out how??)

AND for me, it was totally free! I already had all my supplies:


  • Canvas
  • Paint
  • Scrapbook Paper
  • Hot Glue Gun (or other glue, but I just love gluing with my gun so I couldn't pass up this opportunity...)
1. First, paint your canvas. I have had this canvas for awhile. There are so many cute projects to do on canvas, and unfortunately I have failed at most of them on this particular canvas. Anyways, I painted over my other mistakes with white and then brown, which is the color I wanted for the background of this project. 
 
2. Next, cut out a circle for the inside of your flower. I chose brown. Then cut out all of the petals. To do the petals, cut a 2-inch strip from the bottom of a piece of scrapbook paper and then cut the strip into smaller squares. This doesn't have to be perfect, just kind of eyeball it. 

 Then cut from one corner to the other, turn it around and cut from that corner to the other.


They don't have to be perfect or even all the same size. Then arrange them on the canvas in a flower shape. You can use mine as an example if you want. 


3. The tedious part comes next. Turn each one over and glue them all down where you've arranged them. So fun.

4. Hang it up and enjoy! I love it when I do a project and it actually works. :)

Saturday, May 19, 2012

T Rex Hates Pushups

Boom. That's right, I got it together this Saturday. Two posts in one day.

This isn't really a new idea but I just wanted to put this on here real quick. The boyfriend and I were looking on Pinterest and we saw this shirt with a funny saying...for $25.00. Too much for a shirt you would wear to the gym! So I made him the same one. I designed the picture on my computer and printed it out on an iron-on transfer paper. I think it turned out pretty good. What do you think??


Terrarium

I have been a TERRIBLE blogger lately. Sorry, ya'll!! Life has gotten hectic and my blogging has fallen to the wayside. Tonight I am babysitting for a new family, the kiddos are asleep and I can focus on this. I told the dad before they left that I was going to work on my craft blog once the kids were sleeping. He looked at me like I was crazy! What is so odd about a 24 year old girl staying in on a Friday night to update her craft blog? huh??

Terrariums: these things are the cutest. You can make them big, small, open, closed, whatever. I opted for a closed one. I like the idea of a little environment being all inside. Plus, you don't have to water them which is a major plus for me since many a plant has died by my lack of plant watering abilities. I never said I had a green thumb. That's my mom!

You need:

-a clear glass container with or without a lid
-dirt
-small rocks
-plants
-moss

I got my container at Micheal's for $9.99 but I think you can pretty much find them anywhere. They don't actually have to be containers made for plants, you could use a vase or little jars or something instead.


(I chose the plants above because they were the smallest ones I could find at Home Depot. I have since been informed there are certain plants you are supposed to use for enclosed terrariums. That may explain why my terrarium has since completely died, but that is another story...)

So, first make sure your container is really clean. Wash it out well with soap and hot water. Layer the bottom of the bowl with the rocks. This helps with drainage. Then the soil on top. It should look like this:

Then add the plants and moss. I realized while doing this that one of the plants was way too big even though I did choose the smallest ones so I ended up only using two. Once the plants are in there, layer the moss over all the exposed dirt. I think this helps the soil lock in moisture . 


Cute huh?? Okay so I watered it, put the lid on and basically forgot about it for about a month. I didn't really look closely until one day I did. Apparently plants need air? The plants died and somehow a bunch of fruit flies nested in there and so I had a real mess on my hands. I tried to get my boyfriend to dump the whole thing outside but he wouldn't do it. It was that gnarly. Anyways, lesson learned: take lid off now and then to air out plants. 

Also: there are specific plants that do better in an enclosed environment. 

  • Pilea (Aluminum plant)
  • Ardisia
  • Podocarpus (Buddhist pine)
  • Aeschynanthus (Lipstick plant)
  • Baby Tears
  • Very small ferns
  • Miniature African violets
  • Coffee plant
  • Creeping Charlie
  • Boxus (Boxwood)
  • Creeping Fig
  • Mosses


 I am planning on redoing this with my new knowledge and also I got some mason jars that I think would look adorbs! jk I don't really talk like that. 


Sunday, March 25, 2012

Gift Card Holder

I will be travelling to the lovely city of Savannah, GA this weekend for a wedding. I am a bridesmaid and have been looking forward to this for awhile! After thinking, I decided to get the bride & groom a giftcard. I know, SO impersonal. But I know the bride pretty well (she is one of my best friends!) and I remembered her saying she was hoping everyone just gave them money. So, I opted for the giftcard. And since I am Gina, I wanted to come up with a really cute way to present it. I searched Pinterest and the web for inspiration and came accross this gem:

Cupcake Gift and Money holder

So cute! But how to put the card inside? I was confused so instead I came up with my own version.

Supplies:

1 half sphere of styrofoam ball
1 foam circle with a flat top (looks like a cupcake with no rounded part)
pins
ribbon
scrapbook paper
something for a topper if you want

1. I used turquoise and red, the wedding colors & colors from their invitation. First I took the half sphere and put rows of ribbon on it. I pinned down each little lump with a pin. I tried to make it look kind of like frosting.


2. Then I cut out of strip of red and white striped paper for the cupcake paper. I wrapped it around the base and secured it using Glue Dots (those things rock!)

3. I stuck the two halves together, again using glue dots. I traced a circle to fit the bottom and glued that on, basically just to cover the styrofoam. I had bought a little bride and groom for the top, so I glued it to a toothpick and stuck it in the top like a cake topper. Then I put my giftcard and note in an envelope and glued it to the bottom.

4. I wrapped it up with celophane and used a ribbon to tie it together.


I liked doing this project but it took awhile. It was hard to get the frosting right and to get everything to stay together. It is a little elaborate just for a gift card holder but I think for this wedding, especially since I am in it, it was worth it!